티스토리 뷰
Jeffrey Hamelman Bread : Ciabatta with Poolish
editorwind 2024. 5. 13. 22:44I've had experiences making ciabatta using the poolish method several times with different recipes.
I've made it with this recipe before, but once I mistakenly added expired yeast and the poolish didn't ferment well.
Instead of wasting it, I mixed it by hand into a no-knead dough.
The result wasn't bad, but it didn't taste as good. So, I was curious about how it would turn out if I made it properly.
This time, I followed the recipe in the book.


1. Measurement
I measured according to baker's percentages as follows.

Here, the water weight increased by 7g compared to the original recipe, due to an issue I had overlooked. Since fresh yeast contains more moisture than instant dry yeast, when using dry yeast, you should reduce the amount by about 1/3 compared to fresh yeast. Therefore, you need to add the remaining weight in water. So, if fresh yeast requires 11g, and dry yeast requires 3.6g, you need to add the remaining 7.4g in water. So, I rounded up and added 7g of water. From now on, I'll adjust the recipe by adding the moisture lost due to dry yeast.
2. Making the poolish
Prepare it 12-16 hours before making the main dough.
I added a small pinch of yeast, and the water temperature was set to 27°C.
The room temperature was 21°C.


It's been 14 hours and 25 minutes since the poolish was made. It could be used after 12 hours, but due to my schedule, I left it in the refrigerator after 12 hours.
3. Mixing
I adjusted the water temperature for the main dough as follows.
106 (ideal temperature 24°C x 4) - 21.7 (room temperature) - 21 (flour temperature) - 13.7 (poolish temperature) - 23.6 (estimated frictional heat) = 28.3 (water temperature)
I added all the ingredients and mixed for 2 minutes at the 1st speed and 3 minutes and 30 seconds at the 2nd speed. Since it's a whole dough, it took a bit longer to mix.

Gluten state after mixing

The dough temperature is 24.3°C, which is well-adjusted.
4. First fermentation

I neatly placed the dough after mixing it. The first fermentation was done at 25°C for 3 hours, with folding every hour, a total of 2 times.

Dough after the first folding

Dough after the second folding.
I forgot to take a picture of the finished fermented dough. (I was busy making other bread that day.)
5. Dividing and shaping
The book suggests dividing it into 510g portions, but I didn't want stale dough, so I divided it into 440g portions, making 4 pieces. I stretched them to 40cm x 20cm (width x height) and cut them into 10cm pieces, placing them on floured cloths. Since all 4 couldn't fit on one cloth, I placed one on another cloth.
6. Second fermentation
I let it ferment for 1 hour and 10 minutes in a proofing chamber at 25°C.

7. Baking
After preheating to the highest temperature and adding steam, I turned off the oven for 5 minutes and baked at 240°C for 15 minutes.


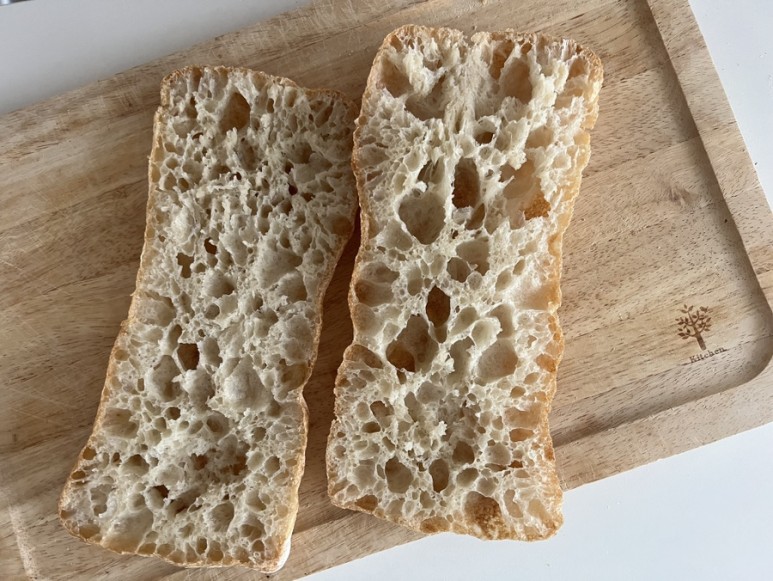
The crumb came out much nicer than the last time I made ciabatta.

Comparing the taste of the ciabatta made this time with the previous one, I realized the importance of the process once again. The taste and flavor of this ciabatta were much better this time. Bread can vary greatly even with the same recipe, which is why baking is so fascinating. It's one of the reasons I enjoy making bread.
Finishing the writing, I think I'll make this poolish ciabatta more often in the future.
'The Story of Baking Bread' 카테고리의 다른 글
| Jeffrey Hamelman Bread : Pain Rustique (0) | 2024.05.13 |
|---|---|
| Jeffrey Hamelman Bread : Ciabatta with Olive and Wheat Germ (0) | 2024.05.13 |
| Jeffrey Hamelman Bread : Ciabatta with Stiff Biga (0) | 2024.05.13 |
| Jeffrey Hamelman Bread : Baguettes with Pâte Fermentée (0) | 2024.05.12 |
| Jeffrey Hamelman Bread : Baguettes with poolish (2) (0) | 2024.04.19 |
- Total
- Today
- Yesterday
- Baguette
- 박찬욱
- 첩보물
- spy
- Jeffrey Hamelman
- jeffrey hamelman bread
- bread
- 제프리 해멀먼
- thelittledrummergirl
- poolish
- 드라마추천
- 베이킹
- ASSASIN
- 드라마
- 플로렌스퓨
- 더 리틀 드러머 걸
- 바게트만들기
- 바게트
| 일 | 월 | 화 | 수 | 목 | 금 | 토 |
|---|---|---|---|---|---|---|
| 1 | 2 | 3 | ||||
| 4 | 5 | 6 | 7 | 8 | 9 | 10 |
| 11 | 12 | 13 | 14 | 15 | 16 | 17 |
| 18 | 19 | 20 | 21 | 22 | 23 | 24 |
| 25 | 26 | 27 | 28 | 29 | 30 | 31 |